The Vim Guide for VS Code Users
Arrow keys are slow. You just don’t know it yet.
Most frontend developers use VS Code. Almost none use Vim. But Vim’s editing model is worth learning regardless of your editor. Once you internalize it, reaching for arrow keys feels like walking through mud.
You don’t have to switch editors. VS Code has excellent Vim support. What matters is the model — the way Vim thinks about text.
This guide starts from zero. By the end, you’ll have everything you need to start.
The Basics
Modes
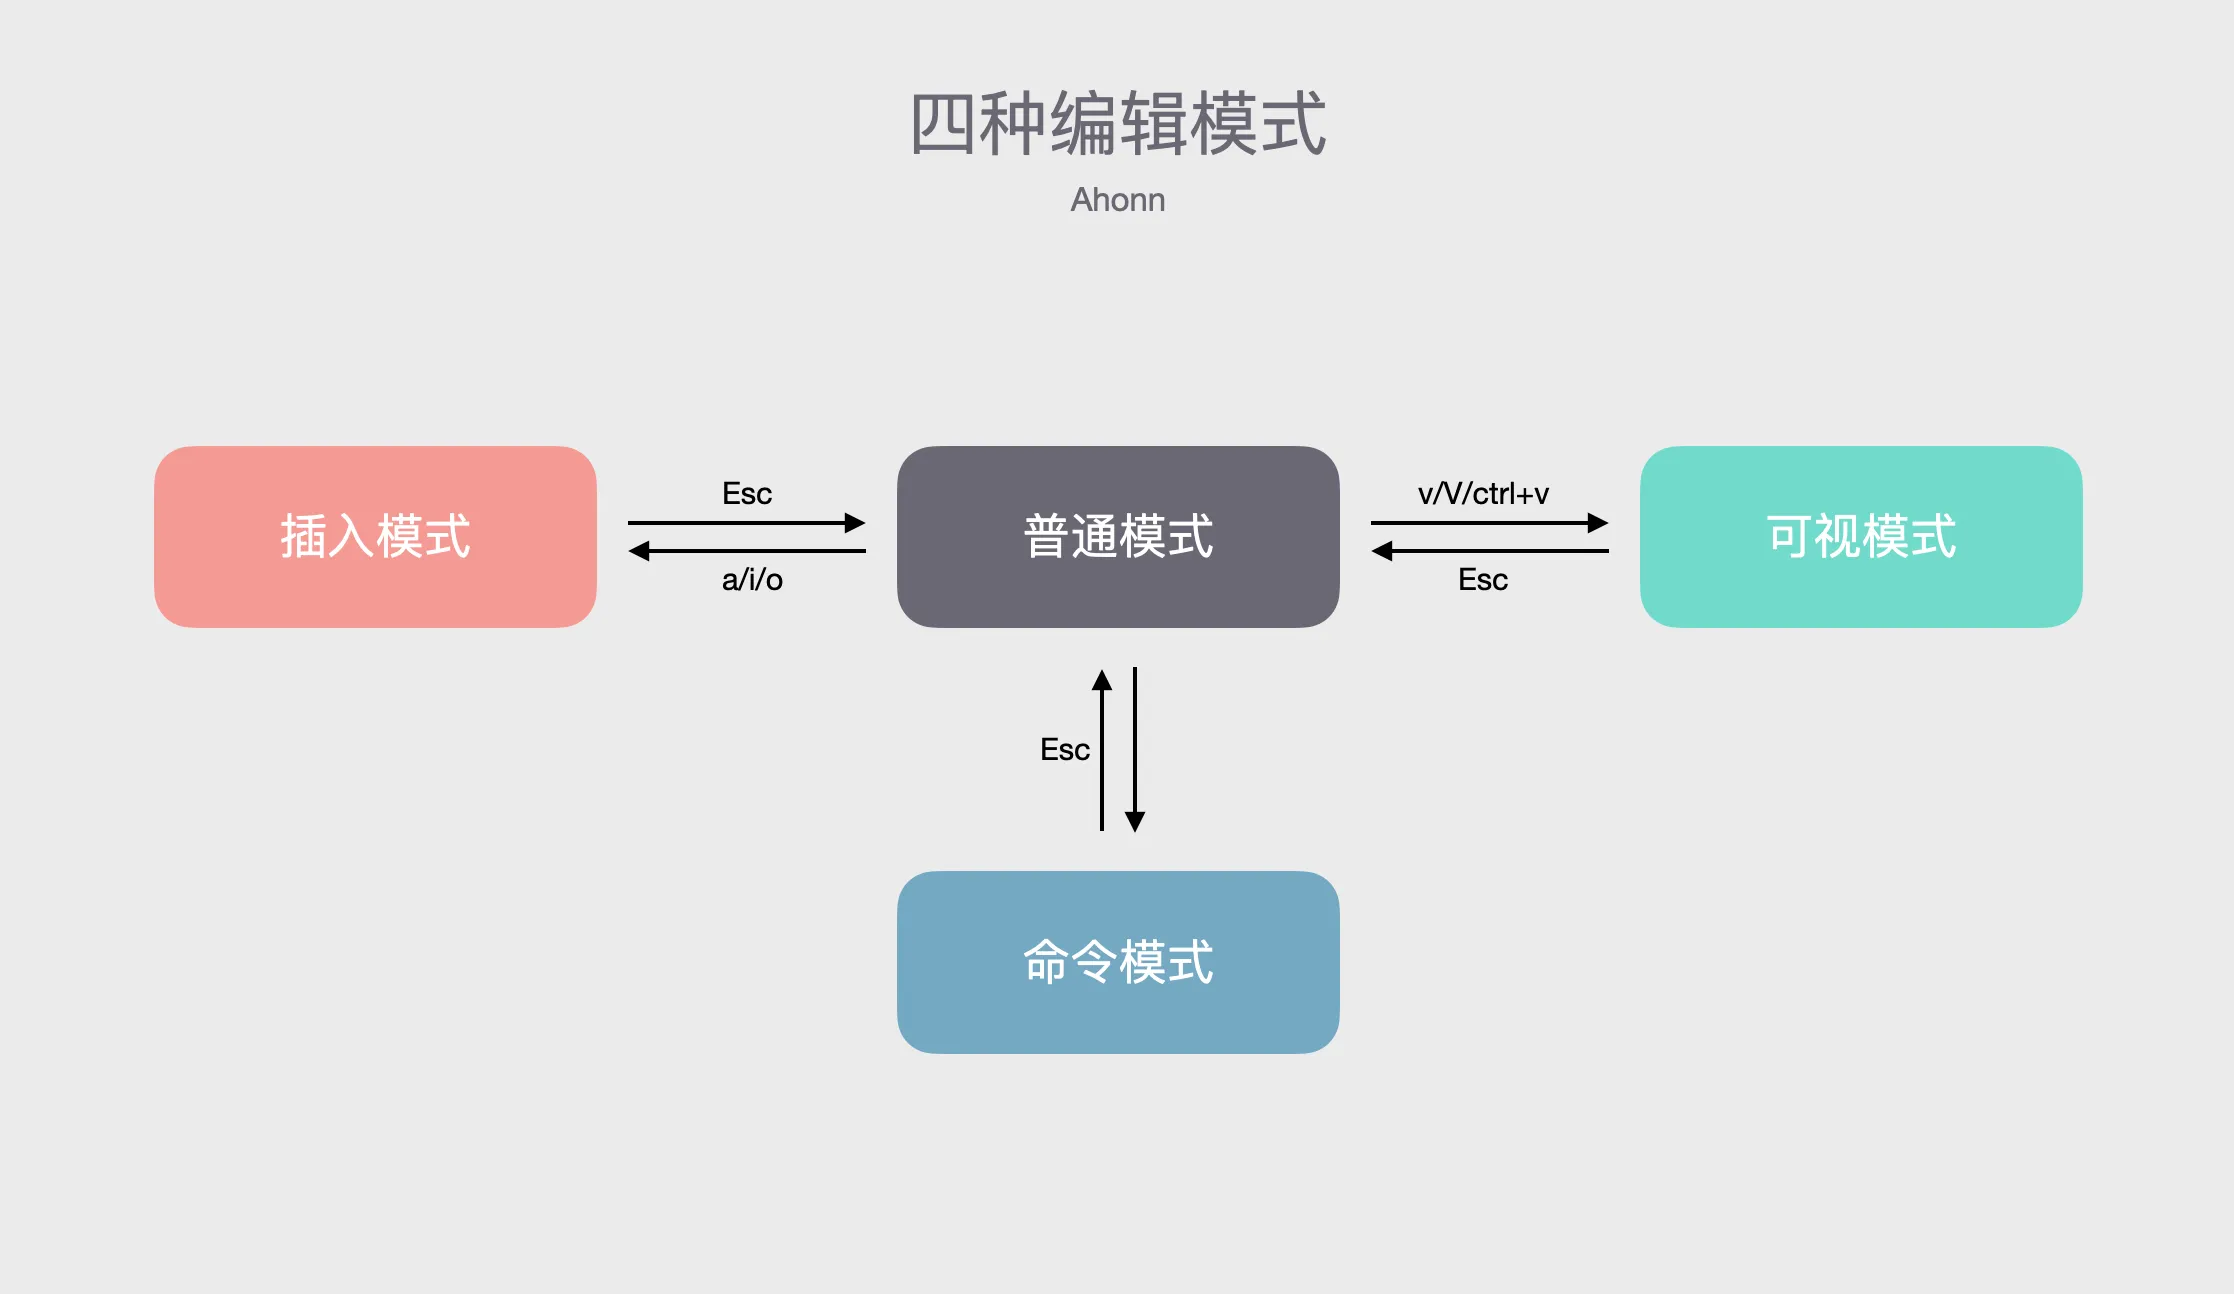
Vim has four modes: Normal, Insert, Visual, and Command-line.
Other editors have one mode. You type, it appears. Simple.
Vim separates navigating from editing. You move in Normal mode. You type in Insert mode. You select in Visual mode. You run commands in Command-line mode.
This sounds complicated. It isn’t. You’ll switch between modes constantly, and it’ll become muscle memory.
Normal Mode
When you open Vim, you’re in Normal mode. Your keyboard doesn’t type — it commands.
h/j/k/l move the cursor. Left, down, up, right.
Why not arrow keys? Because your fingers never leave the home row.
Commands take counts. Want to move down 10 lines? 10j. Delete 5 lines? 5dd. This is faster than holding down a key.
Moving Around
Here’s what you need:
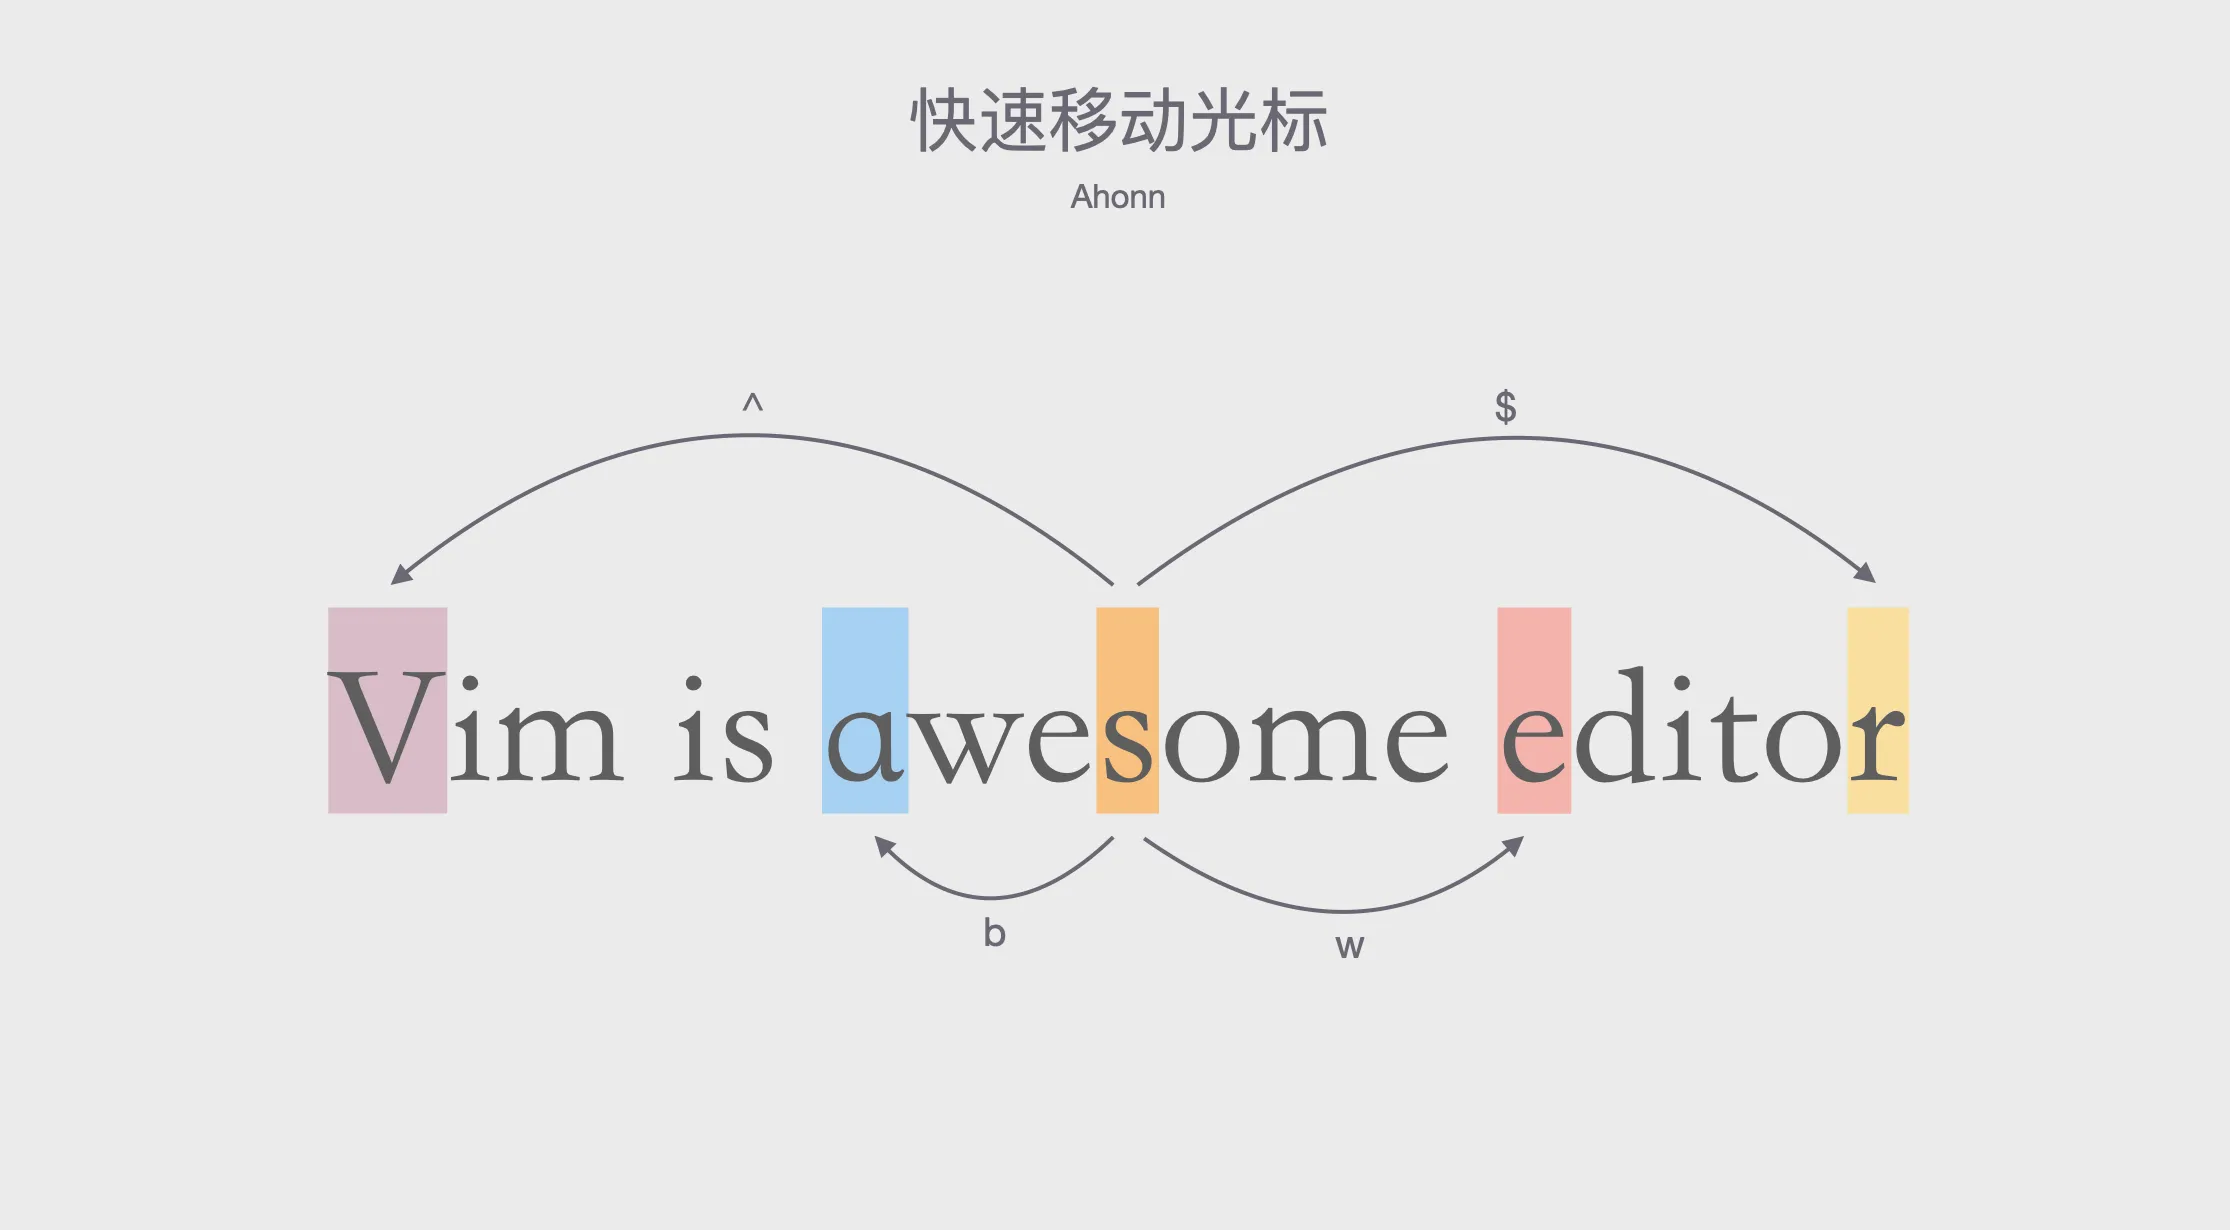
h/j/k/l— left, down, up, right^/$— start / end of linew/b— next word / previous wordf{char}/F{char}— jump to next/previous occurrence of a character
h and l are left and right. j goes down (your index finger’s home position). k goes up.
^ and $ work like regex anchors. Start of line, end of line.
w and b hop between words. 2w moves two words forward.
f{char} is powerful. Want to jump to the next =? Press f=. Done.

Master these, and you’ll never reach for your mouse again.
Insert Mode
Insert mode is what other editors call “normal.” You type, characters appear.
To enter Insert mode from Normal mode:
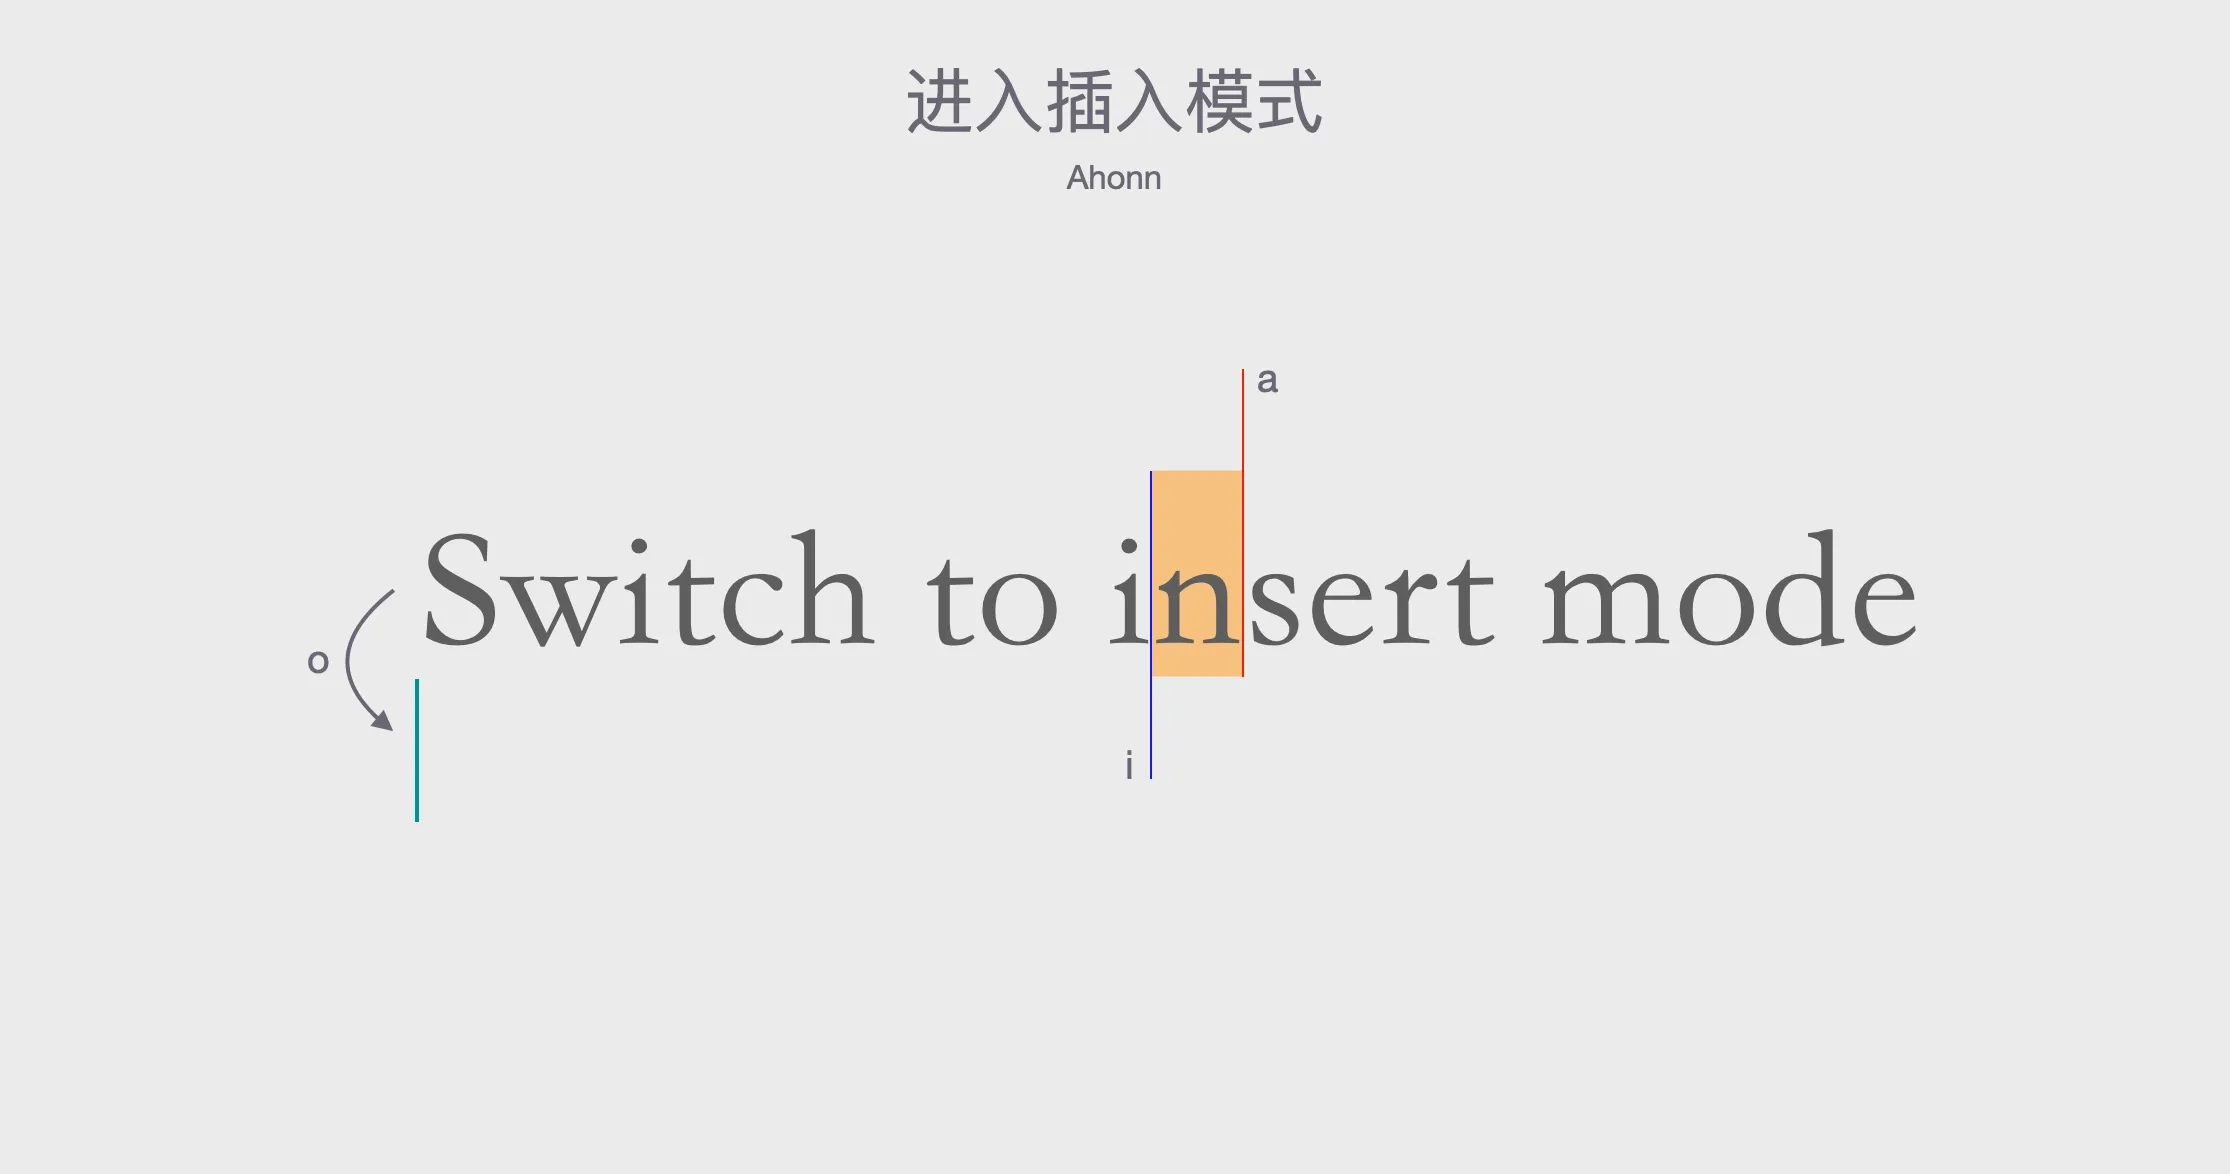
i— insert before cursora— insert after cursoro— insert new line below
Variations
Uppercase versions do more:
I— insert at start of line (like^i)A— insert at end of line (like$a)O— insert new line above (likeko)
To exit Insert mode: Esc or Ctrl+[.
The workflow: Normal mode to navigate, Insert mode to type, back to Normal mode. Like a painter picking up the brush, painting, putting it down to think.
This feels awkward at first. Then it becomes automatic. Then regular editors feel broken.
Visual Mode
How do you delete text in Vim?
You could enter Insert mode and use backspace. But that’s slow.
In Normal mode, x deletes a character. d deletes a range.
Common d commands:
dd— delete entire linediw— delete current worddt{char}— delete until character
But what if you want to select exactly what to delete?
Press v to enter Visual mode. Move with h/j/k/l/w/b/f. The selection follows. Press d to delete.

V selects entire lines. Ctrl+v selects columns.
Cut, Copy, Paste
d is cut, not delete. The text goes to a register.
y is copy (yank). yy copies a line.
p is paste.
Select with v, copy with y, move somewhere, paste with p. Simple.
Text Objects
This is where Vim gets interesting.
diw means “delete inside word.” d is the command. iw is a text object.
Text objects let you operate on logical chunks without moving the cursor first:
iw— inside wordaw— around word (includes trailing space)i(— inside parenthesesa(— around parentheses (includes the parens)
Replace ( with any paired character: i[, i{, i", i'.
yiw copies the word under your cursor. ci" changes everything inside quotes. da( deletes a function call’s arguments, parentheses included.

This is Vim’s superpower. Learn text objects.
Command Mode
Press : in Normal mode to enter Command mode.
Essential commands:
:q!— quit without saving:w— save:wa— save all:s/old/new/g— replace text
There are hundreds of commands. You’ll use maybe ten.
Key Mappings
Vim lets you remap anything.
In ~/.vimrc:
nnoremap <C-f> :s/Now Ctrl+f starts a find-and-replace.
nnoremap means “normal mode, non-recursive mapping.” Use inoremap for Insert mode, vnoremap for Visual mode.
Non-recursive means the mapping won’t chain. If you map a to b and c to a, pressing c gives you a, not b. This prevents infinite loops.
The Leader key is Vim’s modifier. Default is ,. I use Space:
let g:mapleader = "\<Space>"Then:
nnoremap <Leader>j 2jPress Space, then j, to move down two lines.
This is why I love Vim. Total control over keybindings. No conflicts. No restrictions.
Macros
Macros record and replay actions.
Press qq to start recording into register q. Do something. Press q to stop.
Press @q to replay. 10@q replays ten times.
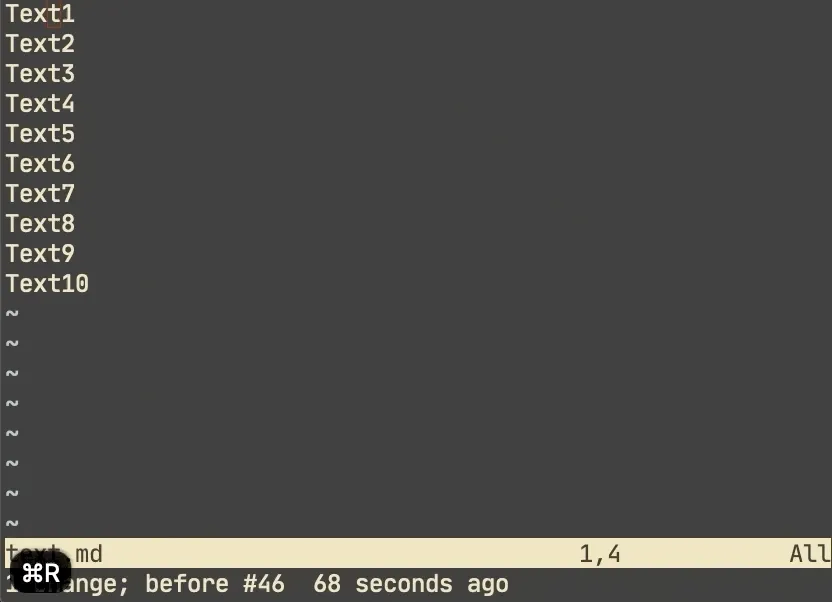
Example: add prefix and suffix to 10 lines.
Record once: I, type prefix, Esc, A, type suffix, Esc, j. Stop recording.
Then 9@q for the remaining lines.

I use macros constantly for transforming JSON, converting enums, reformatting data.
Basic Configuration
Vanilla Vim is spartan. Add this to ~/.vimrc:
Line Numbers
set number
set relativenumber
number shows the current line. relativenumber shows relative distances — essential for commands like 10j.

Better Indentation
nnoremap < <<
nnoremap > >>
Now > and < indent without pressing twice.
set shiftwidth=2
set tabstop=2
set autoindent
set smarttab
set expandtab
Two-space indentation with spaces, not tabs.
Better Movement
noremap H ^
noremap L $
noremap J G
noremap K gg
Now H/L go to line start/end. J/K go to file start/end. Logical extensions of h/j/k/l.
Vim in VS Code
You don’t need to switch editors. VS Code has excellent Vim support.
Two options:
VSCodeVim
VSCodeVim emulates Vim in VS Code.
Configuration lives in settings.json:
{
  "vim.insertModeKeyBindings": [
    { "before": ["j", "j"], "after": ["<Esc>"] }
  ],
  "vim.normalModeKeyBindingsNonRecursive": [
    { "before": ["H"], "after": ["^"] },
    { "before": ["L"], "after": ["$"] }
  ]
}
It works. But you can’t reuse your .vimrc, and configuration is verbose.
Good for beginners who want to stay in VS Code.
vscode-neovim
vscode-neovim embeds actual Neovim into VS Code.
This is what I use. It reads your existing Vim config. It’s fast. You get real Vim, plus VS Code’s extensions.
The catch: you need Neovim 0.5+ installed. More setup, but worth it.
Wrap VS Code-incompatible plugins in your config:
if !exists('g:vscode')
  " Vim-only plugins here
endif
Keep Going
This guide covers the fundamentals. There’s much more: splits, buffers, registers, advanced motions.
Read Learn Vim the Smart Way or Practical Vim.
The learning curve is real. But once Vim clicks, you’ll wonder how you ever edited text any other way.
Start small. Use Vim mode in VS Code. Let muscle memory build. One day you’ll realize the arrow keys feel wrong.
That’s when you know it worked.